How to connect your ultrasonic equipment
Connecting and installing SonoSpeech ultrasound biofeedback
Components and connections for SonoSpeech visual biofeedback (Ultrasound only)
 Requirements:
The SonoSpeech biofeedback system requires a PC/laptop/tablet running Windows (7/10/11) with one USBA port. The laptop should have minimum 512GB disk, 32GB RAM and an NVIDIA graphics card if fast live tongue tracking is desired. An external hard disk is strongly recommended to back up recorded data.
- Download the latest revision of SonoSpeech from the downloads page on this website.
- Follow instructions in Sonospeech User Manual 220_04 to install the software.
- Use the SonoSpeech connection YouTube video as a guide to connecting your ultrasound.
Connecting and installing the MicrUs speech research system
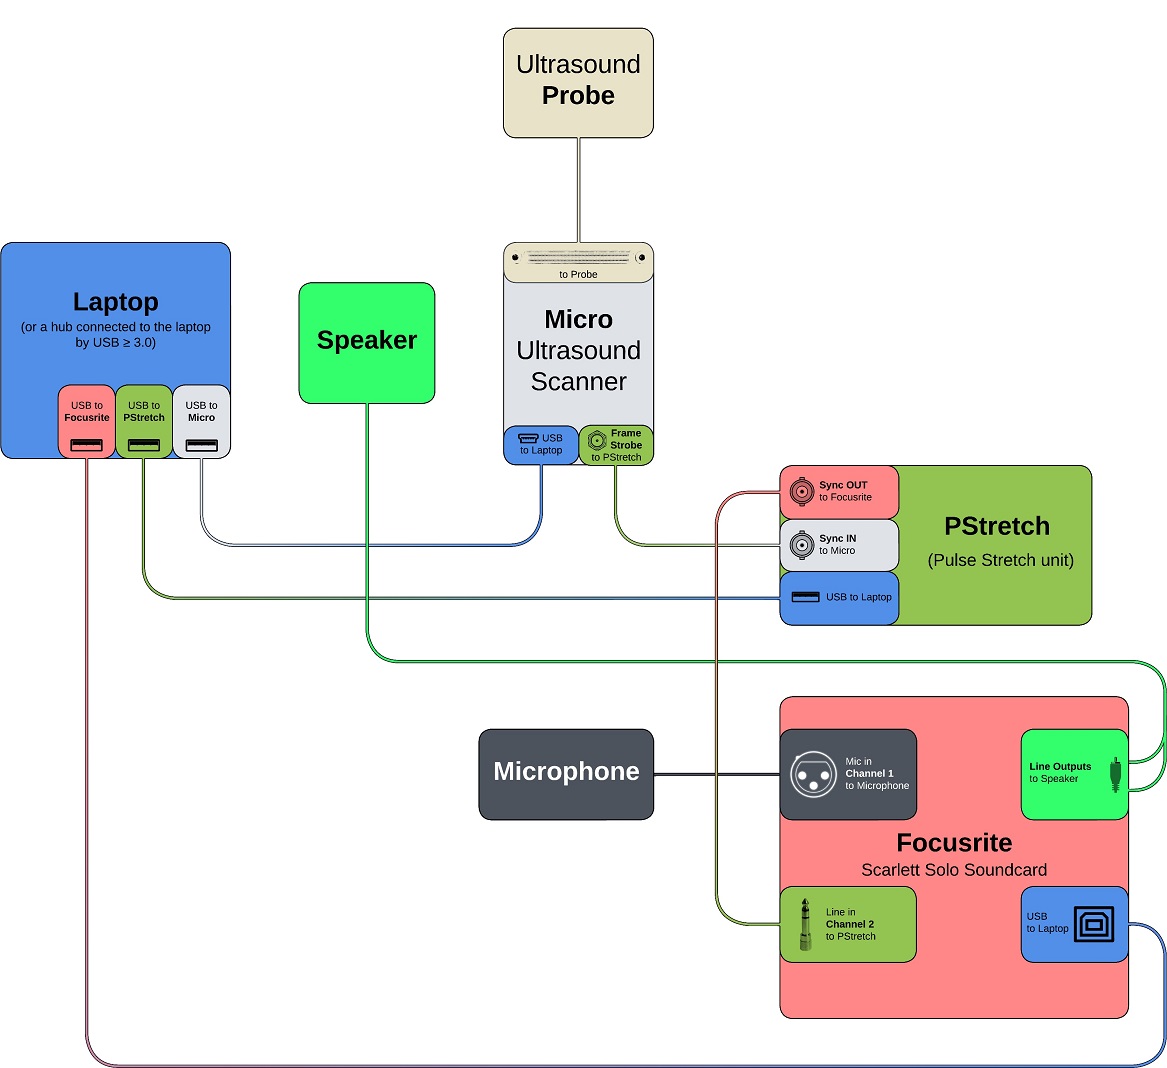
Components and connections for MicrUs speech research system (Ultrasound + Audio + PStretch)
Requirements:
The MicrUs speech research system requires 4 USBA type ports for AAA licence key, PStretch 5V power, MicrUs and Focusrite Scarlett soundcard. Many modern laptops provide only one USBA port so a USB-C hub will be required. There are different types of interfaces that use a USB-C port so selecting a laptop with the correct type to provide power and data bandwidth is crucial. See this guide for what to look for in a laptop and USB hub. The laptop should have minimum 512GB disk, 32GB RAM and an NVIDIA graphics card if fast tongue contouring is desired. An external hard disk is strongly recommended to back up recorded data.
WARNING: If you have already installed AAA, DO NOT UNINSTALL. Continue to follow the instructions below to install AAA again. |
- Download the latest revision of AAA from the downloads page on this website.
- Follow instructions in AAA Manual_221_12 Aug 05 draft to install the AAA software and drivers.
- Use the MicrUs speech research system YouTube connection video as a guide to connecting your MicrUs speech research system.
Overview
AAA automatically synchronises the recorded ultrasonic images with the acoustic speech signal. It does this by recording multichannel audio with a microphone signal on one channel and a stretched “frame strobe” line level signal on a second channel. AAA then detects the stretched frame strobe pulses and aligns each image to the correct pulse.
PStretch unit
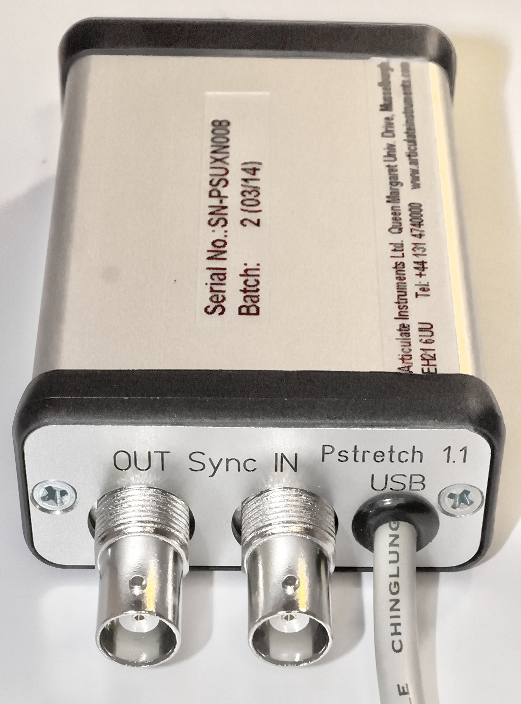
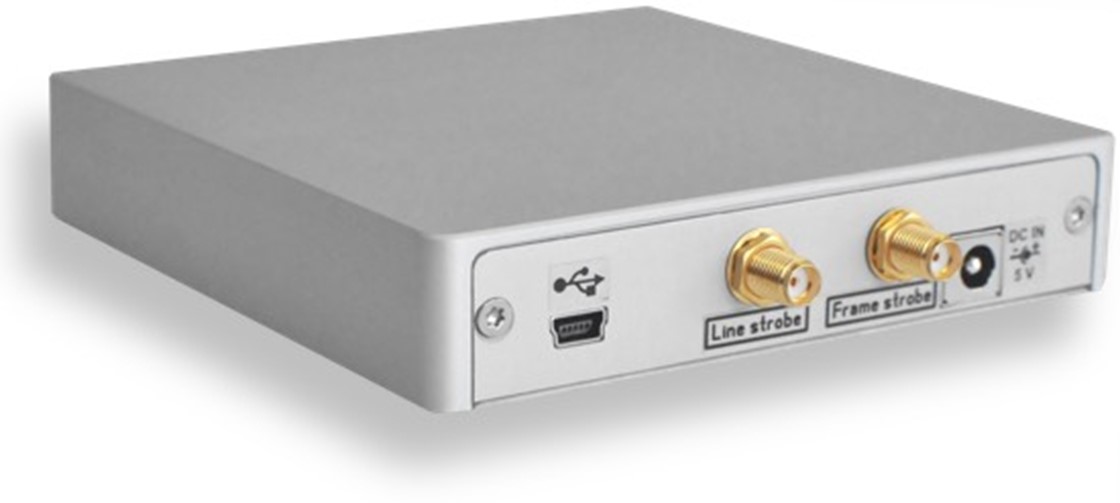
The “frame strobe” signal comes from the rightmost gold connector on the rear of the Micro.
 +
+  + +
+ + 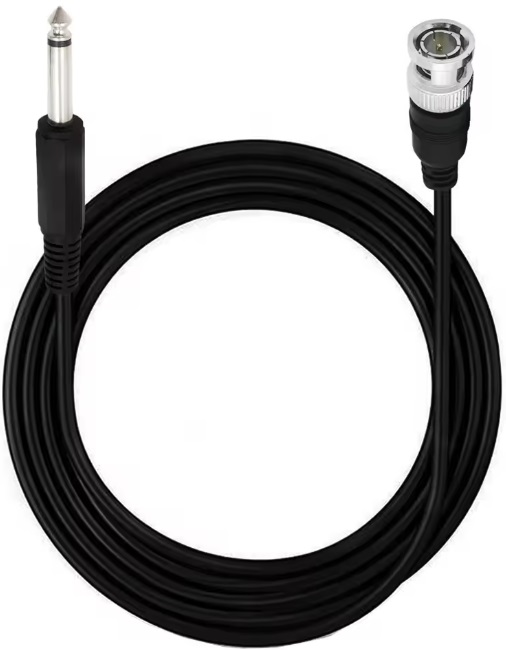
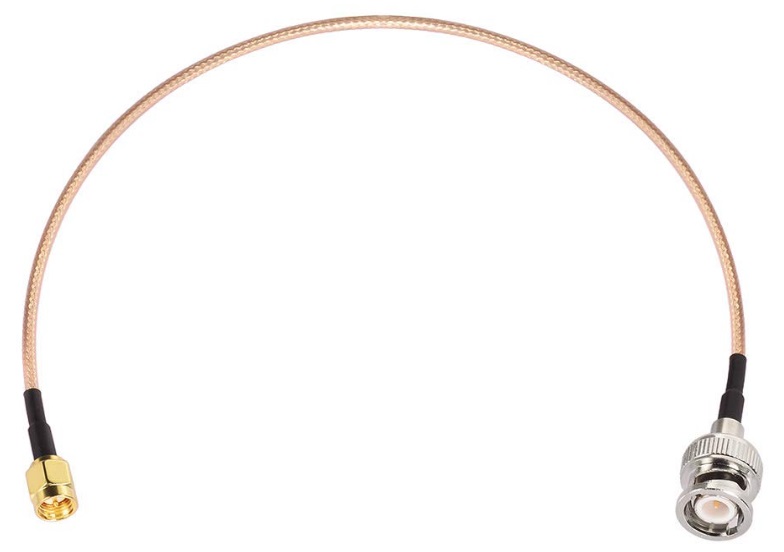
MicrUs scanner SMA to BNC cable PStretch Sync IN BNC to Jack PStretch SYNC OUT to LINE IN on Scarlett
The frame strobe pulses are only a few nanoseconds long so they need to be “stretched” to a few milliseconds in order for a soundcard to be able to see them at sample rates of 22kHHz and 44kHz. This is what the PStretch unit does. The PStretch output sync signal is at line level so should be connected to a channel with line level input. On the Focusrite Scarlett Solo Gen2 and Gen3 this is channel 2.
- Connect PStretch to MicrUs scanner. Video tutorial guide
- Connect the PStretch to your Laptop USBA port to provide a 5V supply. Video tutorial guide
Rode SmartLav+ microphone
The Rode SmartLav+ is specially selected to have high sensitivity and flat response up to 22kHz. This ensures it matches with the Focusrite Scarlett range of pre-amps. The microphone comes with a short SC3 cable that converts from a trrs jack plug to trs jack plug. The VXLR+ TRS jack to XLR incorporates a stepdown transformer to allow the SmartLav+ to be powered by the 48V phantom supply.

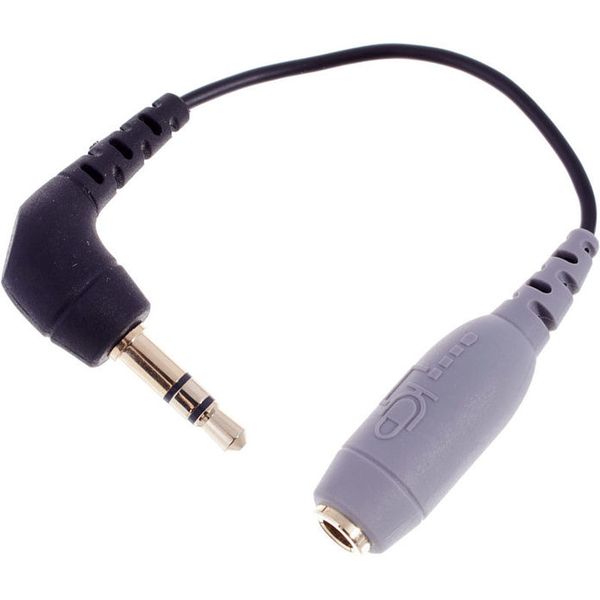
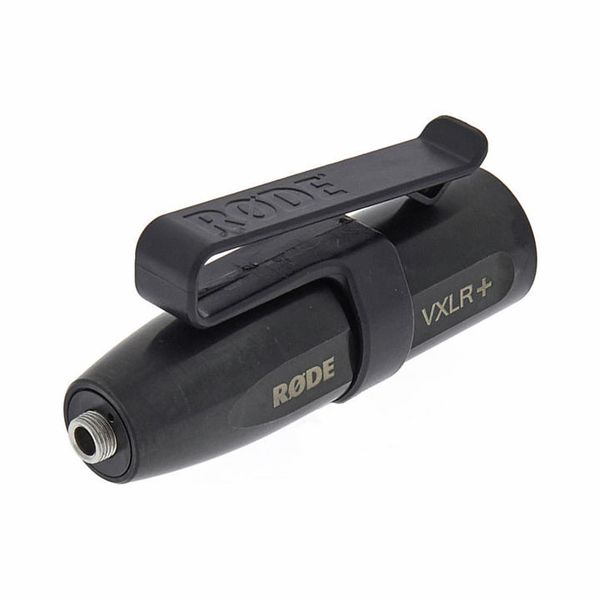
SmartLav+ SC3 VXLR+
Focusrite Scarlett soundcard/microphone pre-amp
Unfortunately Focusrite change their model design every couple of years, so there are slightly different instructions for connecting audio depending on which model you have. Video tutorial guide
The following settings apply to all models:
- The 48V phantom power button must be switched ON or there will be no microphone signal.
- The channel that the PStretch is connected to must be set to LINE and not INST or AIR
- The monitor dial must be set to the 2 o’clock setting to provide the right speaker level.
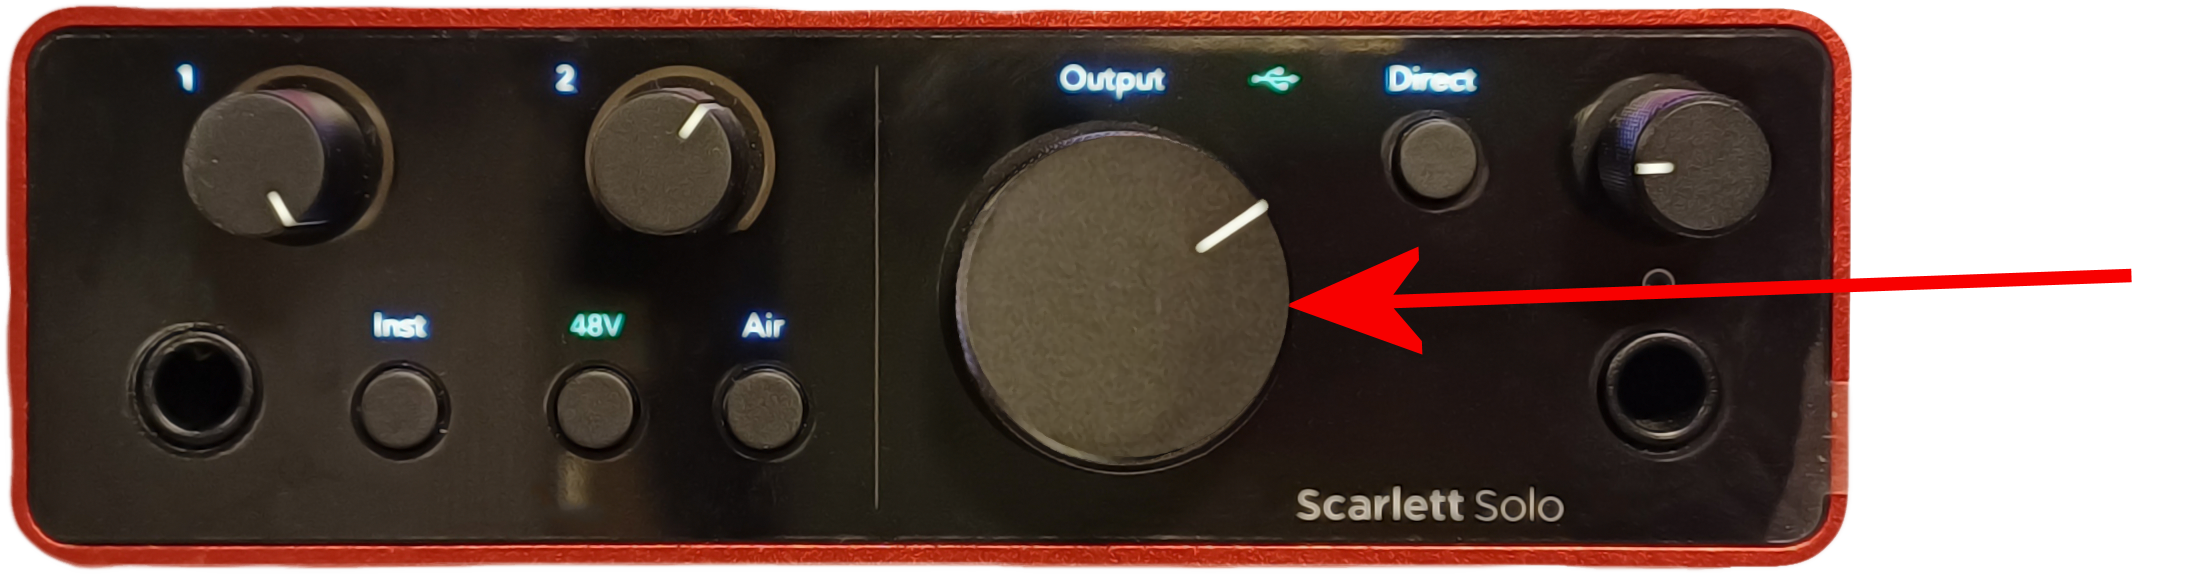
- The Direct monitor must be OFF.
- Speaker or headphones must be connected to the LINE OUTPUTS on the rear of the soundcard.
- Scarlett must be selected in Windows sound manager for both playback as well as recording.
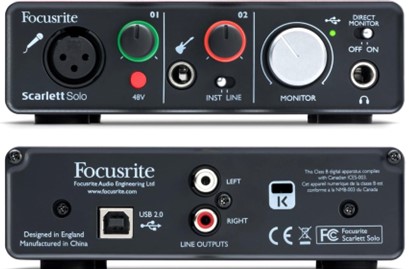
Focusrite Scarlett Solo Gen2
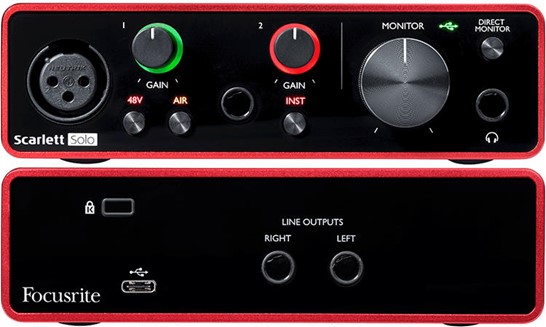
Focusrite Scarlett Solo Gen3
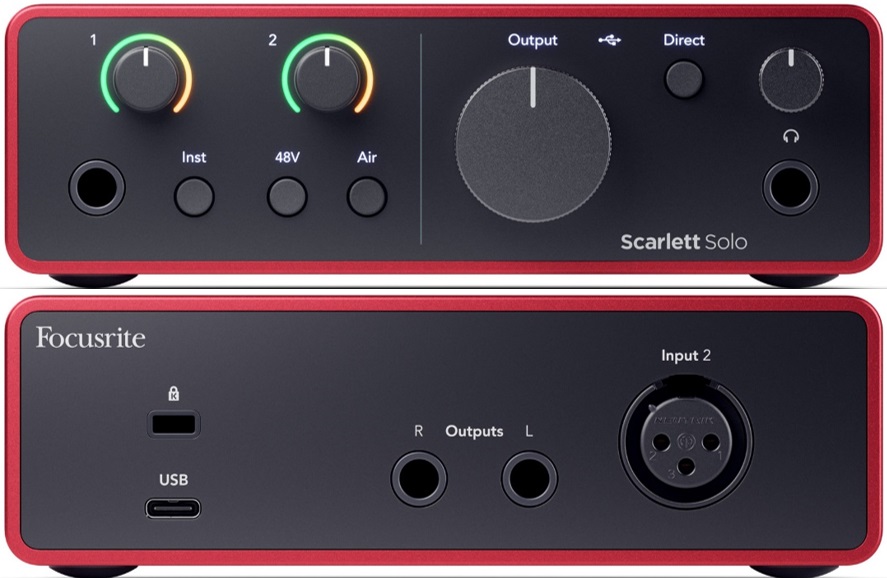
Focusrite Scarlett Solo Gen4
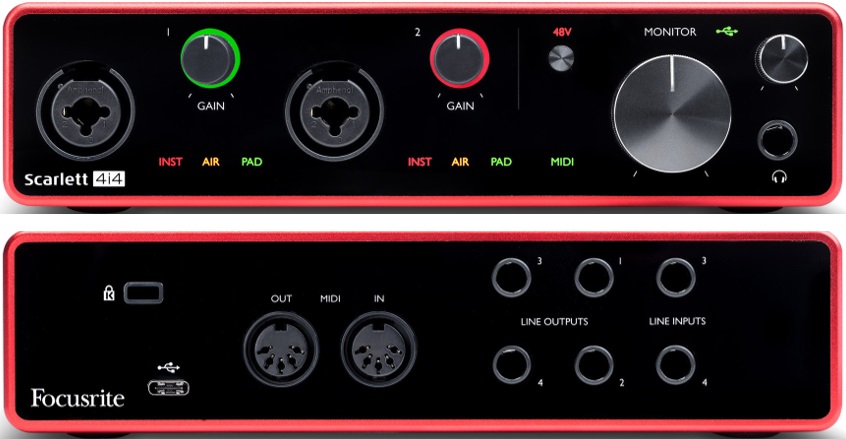
Focusrite Scarlett 4i4 Gen3
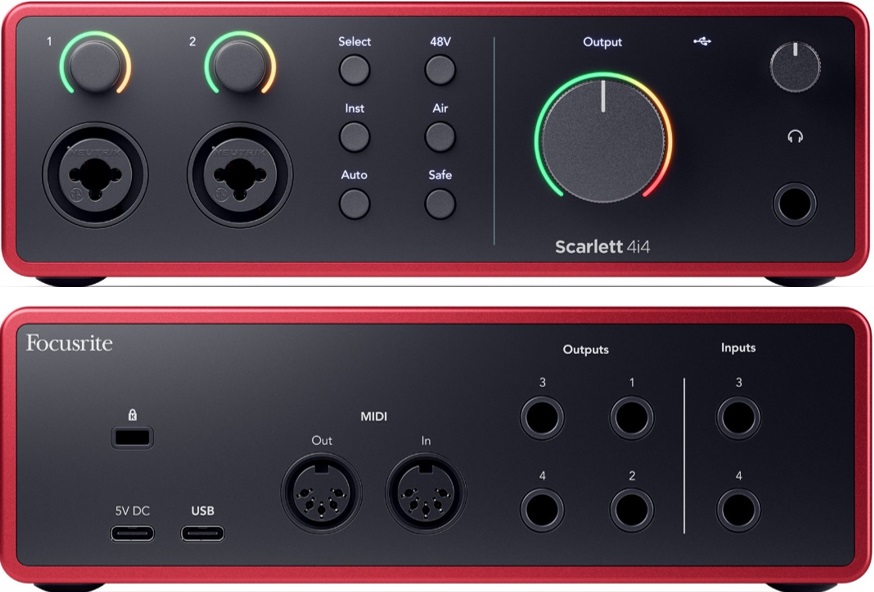
Focusrite Scarlett 4i4 Gen4
Differences:
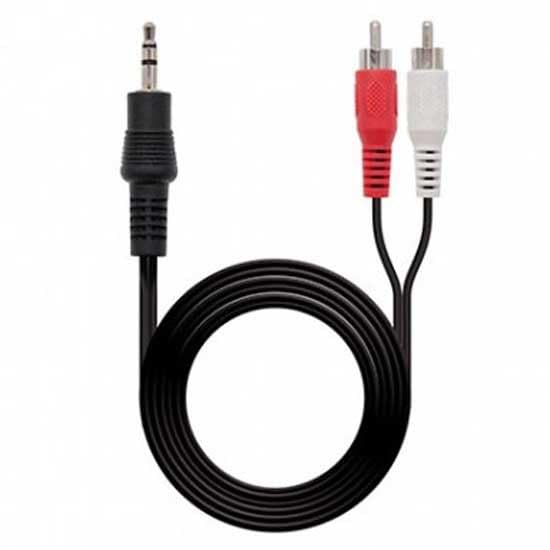
- For all except the Focusrite Scarlett Solo Gen2 two 6.25mm-phono/RCA adapters should be plugged into the LINE OUTPUTS. This allows the twin phono/RCA to 3.5mm jack cable to be connected.
 +
+  +
+ ![]() +
+ 
Jack-phono adapters twin phono to stereo jack cable female-female jack adapter Speaker(not supplied)
- For all except Scarlett Solo Gen4, the microphone should be connected to channel 1.
Connecting and installing the MicrUs speech research system with Lip video camera
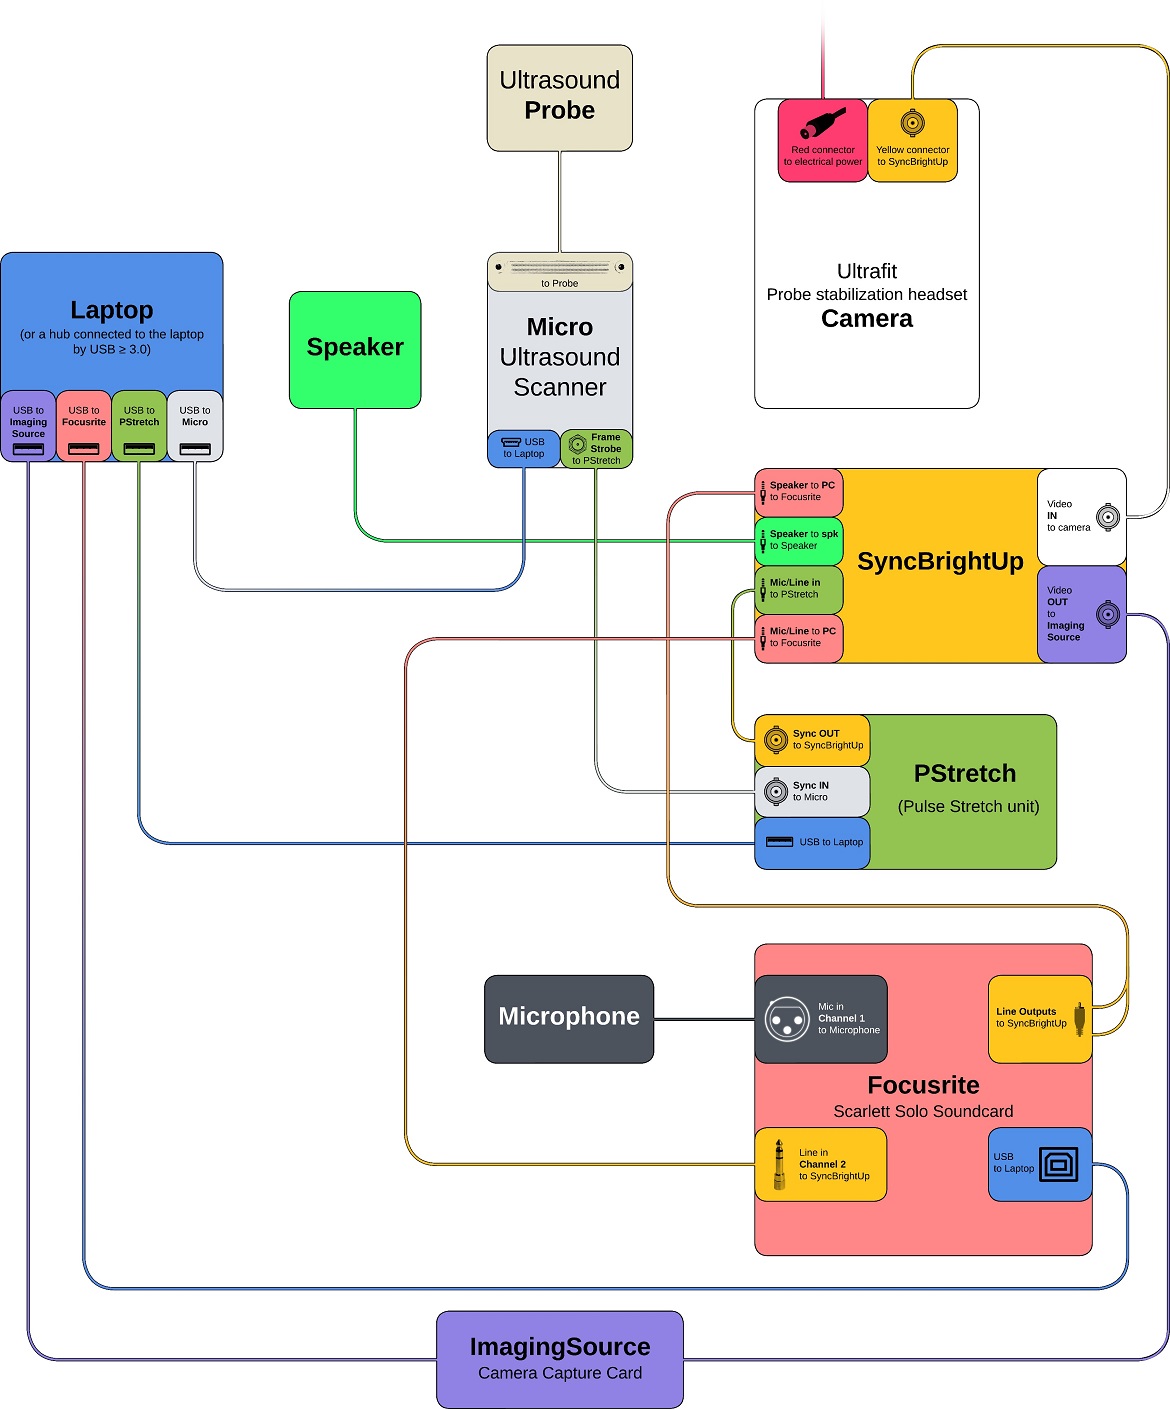
Components and connections for MicrUs speech research system with lip camera (Ultrasound + Audio + PStretch + Video + SyncBrightUp)
Requirements:
The MicrUs speech research system with lip camera video requires 5 USBA type ports for AAA licence key, PStretch 5V power, MicrUs, Focusrite Scarlett soundcard and DFG2USB video capture card. Many modern laptops provide only one USBA port so a USB-C hub will be required. There are different types of interfaces that use a USB-C port so selecting a laptop with the correct type to provide power and data bandwidth is crucial. See this guide for what to look for in a laptop and USB hub. The laptop should have minimum 512GB disk, 32GB RAM and an NVIDIA graphics card if fast tongue and lip contouring is desired. An external hard disk is strongly recommended to back up recorded data.
WARNING: If you have already installed AAA, DO NOT UNINSTALL. Continue to follow the instructions below to install AAA again. |
- Download the latest revision of AAA from the downloads page on this website.
- Follow instructions in AAA Manual_221_12 Aug 05 draft to install the AAA software and drivers.
- Using the MicrUs speech research system with lip camera YouTube connection video as a guide, follow instructions in MicrUs speech research system connection manual.
Overview
When adding lip video camera, a video sync signal must be recorded on an audio channel and the video capture card (DFG2USB) must be connected. If using a two channel Focusrite Scarlett Solo then the video sync and ultrasonic frame strobe pulses must share the same channel. If a 4 channel Focusrite Scarlett 4i4 is used then the video sync signal can be recorded on a separate third channel. To synchronise the audio and video a SyncBrightUp unit is required.
DFG2USB video capture unit
 +
+  +
+ 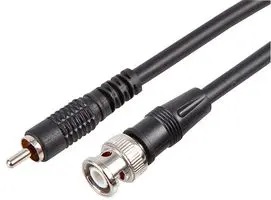
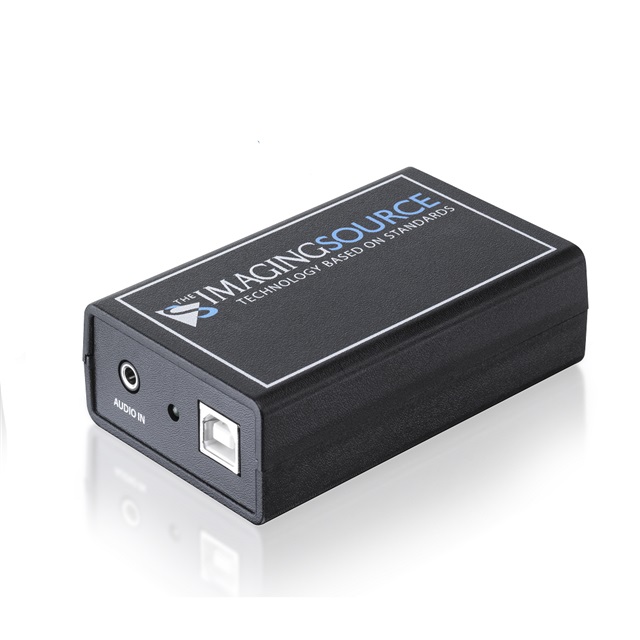
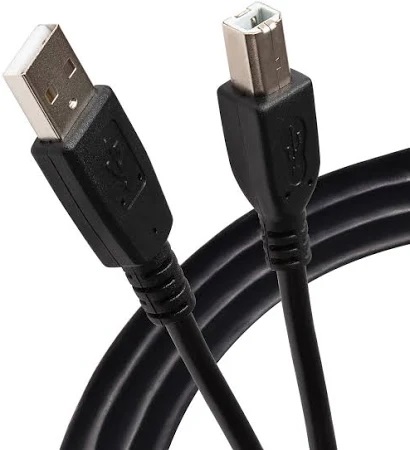
Imaging Source USB video capture DFG2USB USBA to USB B cable BNC to phono cable
- Connect the DFG2USB to the SyncBrightUp unit using the BNC to phono cable.
- Connect the DFG2USB to a USBA port on your laptop or hub.
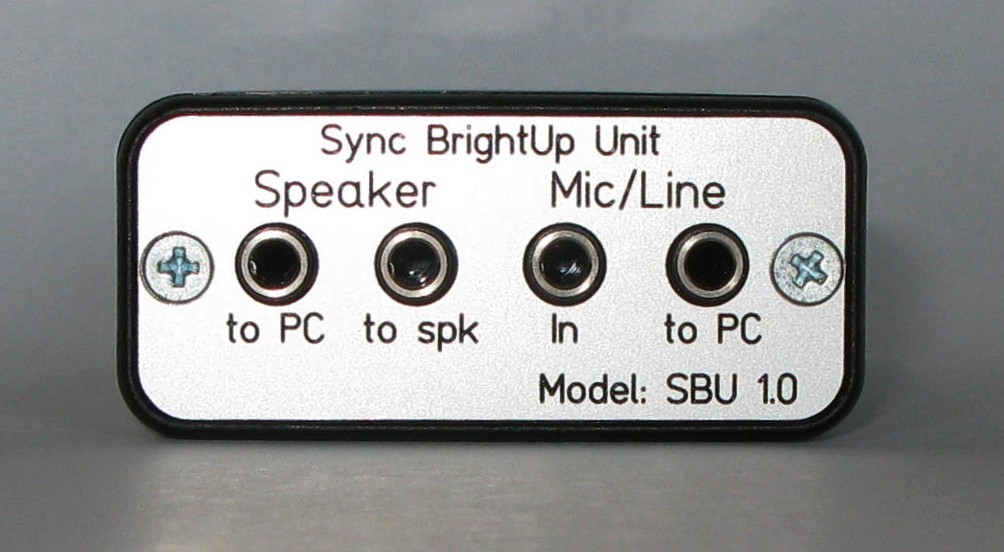
SyncBrightUp Unit
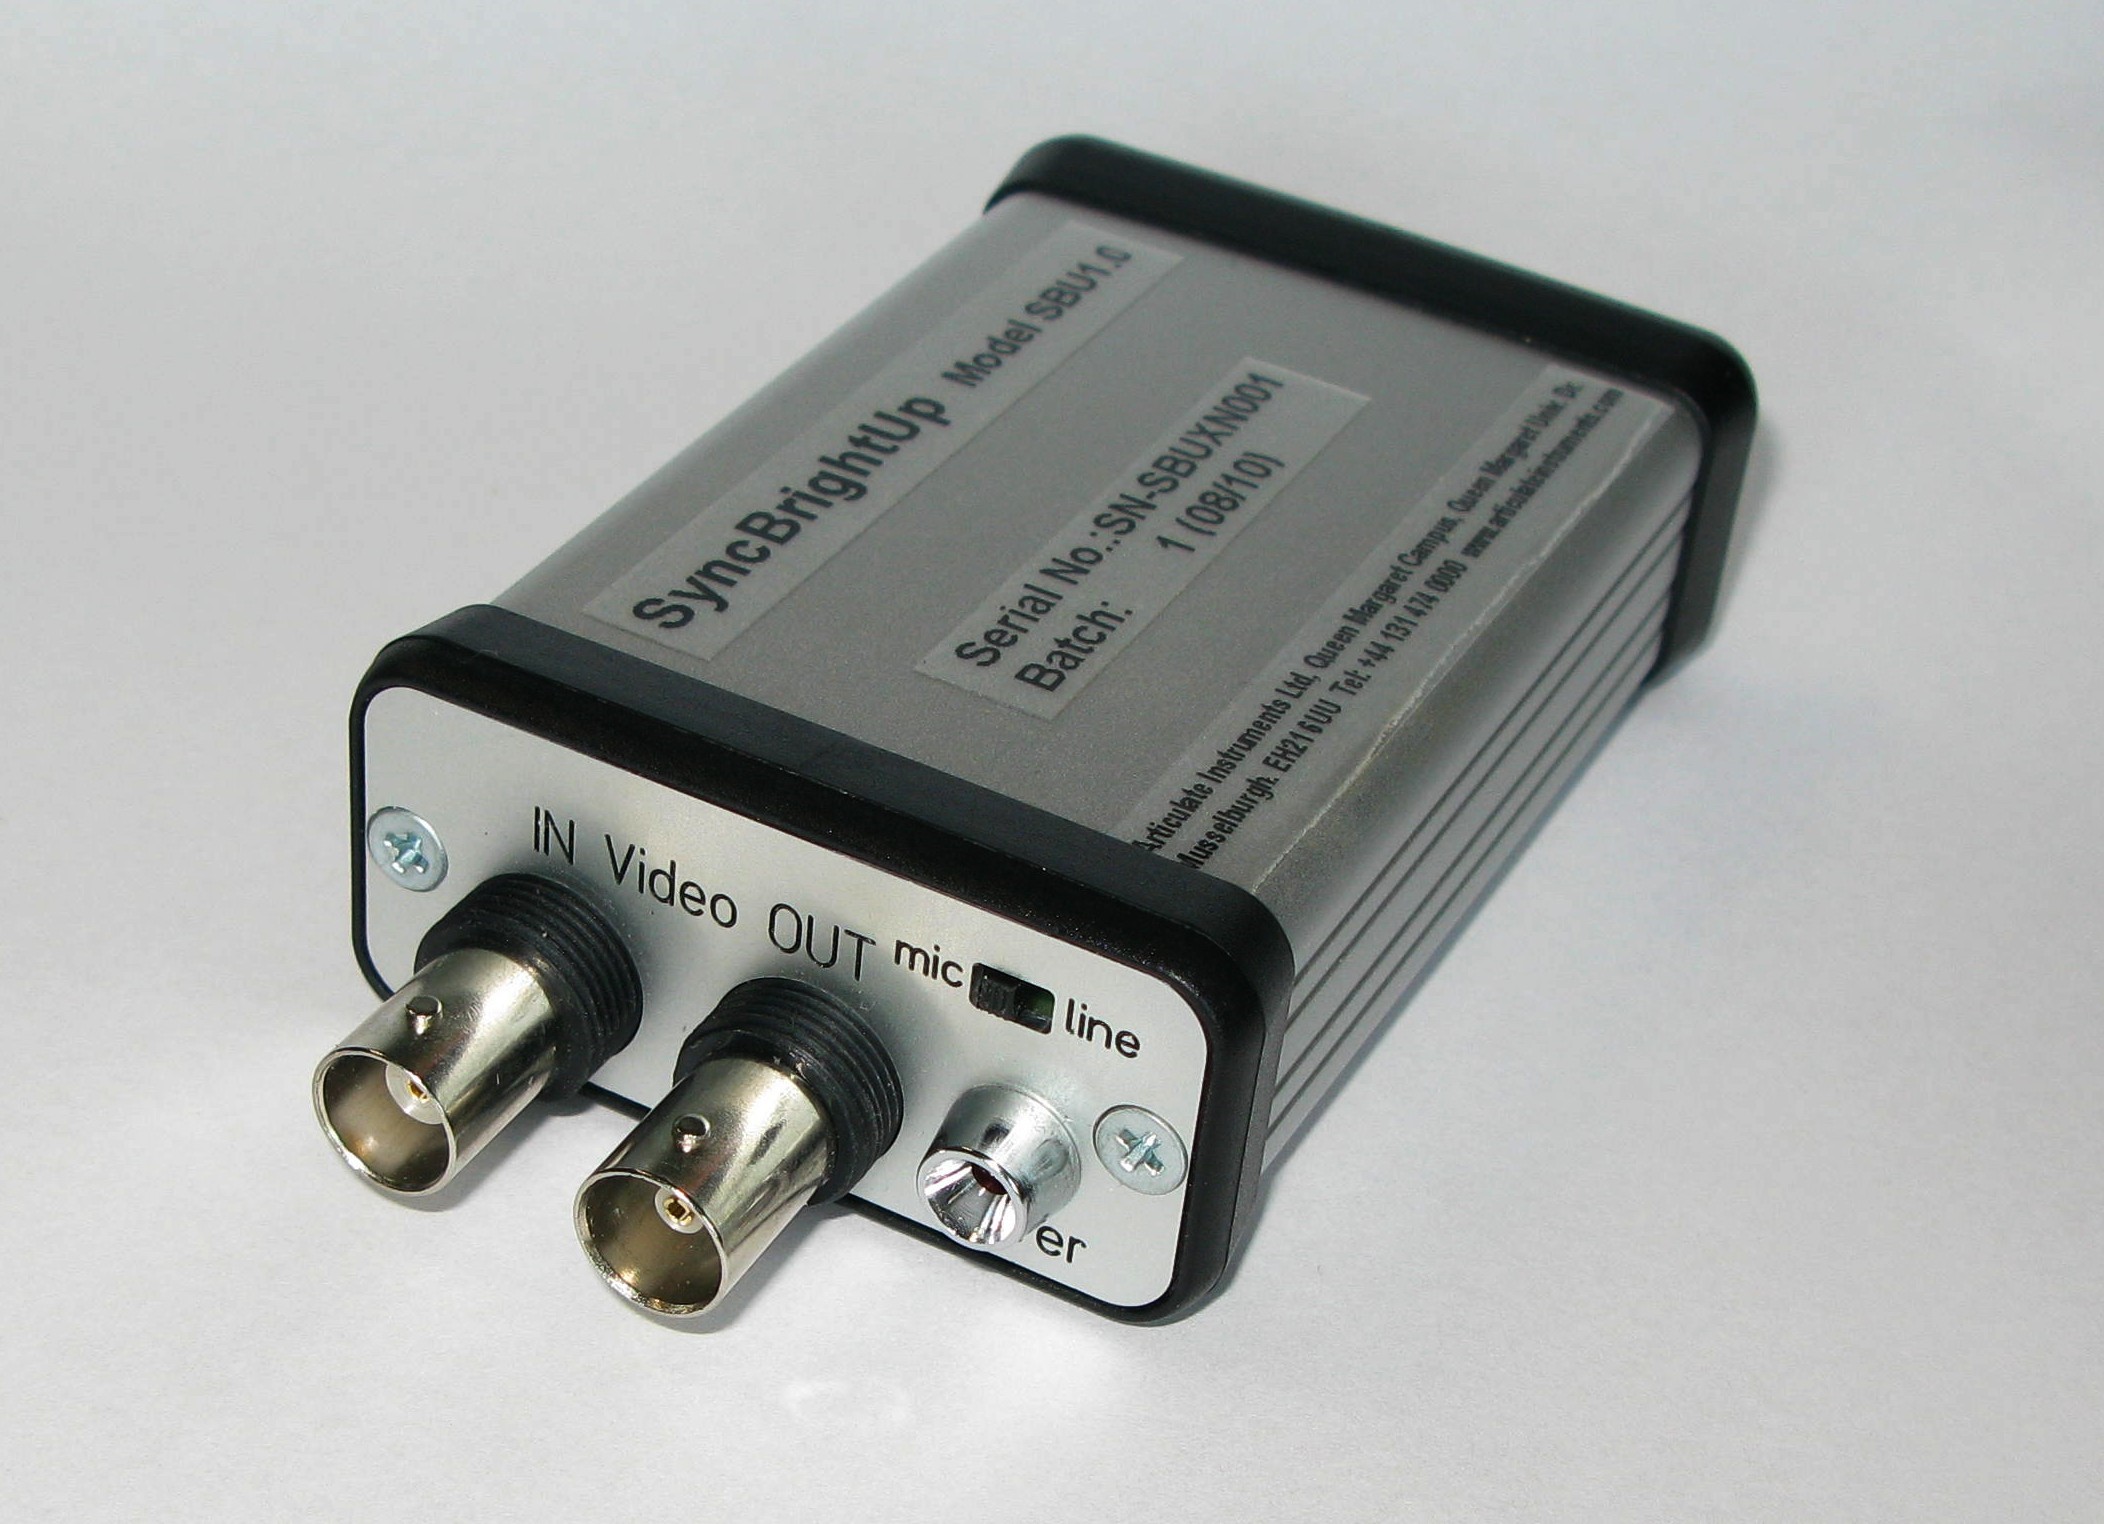
The SyncBrightUp unit interrupts the camera signal and adds a white square to the top left of 4 de-interlaced image frames.
It also interrupts the audio signal and adds a set of 4 tones and a series of 14 pulses to indicate frame rate. ![]()
- The PStretch must be connected to the SyncBrightUp Mic/Line “In”. Video tutorial guide
- The SyncBrightUp Mic/Line “ToPC” is connected to the Scarlett soundcard line input. Video tutorial guide
- The LINE OUTPUTS should be connected via the twin phono to stereo jack cable to SyncBrightUp Speaker “To PC” Video tutorial guide
- Your speaker should be connected to SyncBrightUp Speaker “to spk”
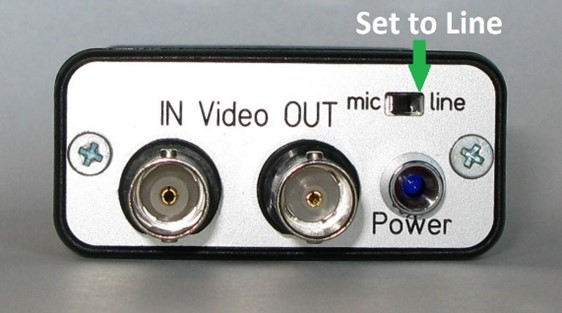
- The Ultrafit camera must be connected to the 5V wall power adapter using the video extension cable. Video tutorial guide
- The UltraFit NTSC camera must be connected to the SyncBrightUp Video “IN” using the video extension cable. Video tutorial guide
- The DFG2USB must be connected to the Video “OUT” Video tutorial guide
- Connect the DFG2USB USB cable to your laptop to supply 5V power. Video tutorial guide
- The mic – line switch must be set to line
With Focusrite Scarlett Solo the video sync and ultrasonic pulses must share the same line level channel. Some adjustments to the AAA software are required to prevent these two signals from overlapping and to ensure that only the ultrasonic pulses are detected for synchronisation. See AAA Manual_221_12 Aug 05 draftfor the required AAA settings.
With Focusrite Scarlett 4i4, the video sync can be recorded on a separate channel. See AAA Manual_221_12 Aug 05 draft for the required AAA settings.
Troubleshooting
Q: The Freeze symbol stays on when I press record.
A: If Windows threat detection software is running which scans files as they are created then this can cause a delay of several seconds between clicking record and the recording actually starting. Make sure threat detection software settings for live scanning are switched off.
Q; Error when opening a recording.
A: If a recording is stopped before ultrasonic data has been recorded then AAA will give an error due to there being no ultrasonic data. Errors in saving data can also occur if continuous synchronization of folders to a cloud or network service are applied to the location where AAA is saving project data. Switch off dynamic cloud synchronisation.
Q: I can’t see a video sync signal on audio channel 2
A: Make sure the SyncBrightUp is set to “line” not ”mic”.
Check that the Windows audio is set to 50% and that the “Monitor” dial on the Scarlett Solo is set to 2 o’clock. Both of these settings control the volume of the speaker output and this volume must be sufficient to trigger the SyncBrightUp unit. Note that if the volume is too loud then the SyncBrightUp may trigger twice. Turn down the volume if this happens. Double trigger will make automatic synchronisation difficult.
Avoid double trigger of Video sync by reducing speaker volume.
Q: The live audio signal does not appear in the waveform display when preparing to record
A: Make sure the correct Gen drivers for the focusrite Solo are installed. Either Gen 2 (systems bought before 2020) or Gen 3 (systems bought 2020 onwards)
Q: A message “Sync signal is missing” appears when recording.
A: This occurs because the ultrasound sync pulses cannot be detected. Potential reasons are: 1. The internal soundcard has been selected as the recording device instead of the Focusrite Scarlett external soundcard. Solution: Go to Windows Sound Setttings and select the Focusrite as the recording AND playback device. 2: The wrong channel has been selected in the Sync dialogue. Solution: Right-click on ultrasound image and select the Sync dialogue from the popup menu. Then check the Channel setting matches the channel the pulses are recorded on. 3: The amplitude of the ultrasound sync pulses is too low. Solution: Turn up the gain control for the sync signal on the external soundcard (Focusrite). Alternatively, lower the Threshold setting in the sync dialog but beware that if the sync signal amplitude is too low then background noise may interfere with accurate pulse detection.
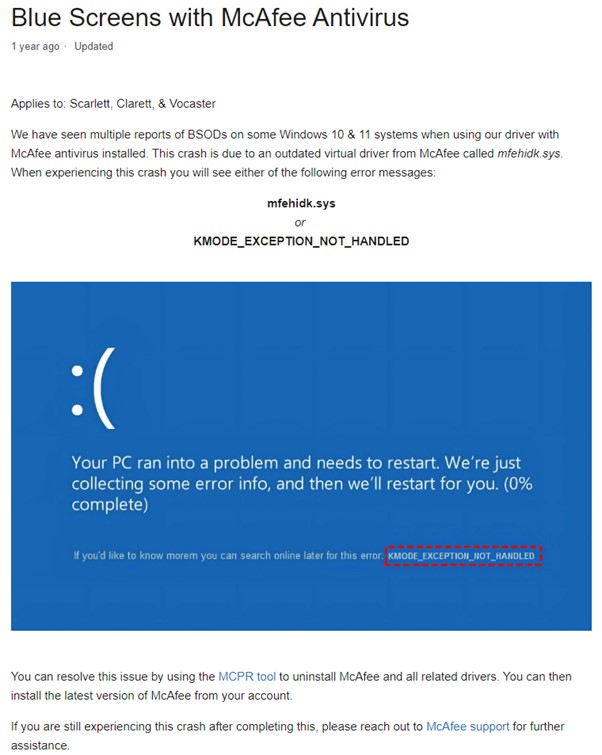
Q: When I connect the Focusrite Scarlett to my PC it crashes with a blue screen
A: This is due to a conflict with McAfee anti-virus software